Ever since we have started our flock, we have added more chicks every spring so as to keep revitalizing the flock and to keep a steady supply of eggs available. This year we were not financially able to follow our normal plan, and though our little one was sad as we usually always get chicks near her birthday, we explained the situation to her and decided we would have to wait. We had hoped that having four hens go broody [3 Black Australorpes and 1 Barred Rock] would have remedied that situation, but for some reason they just can't seem to hatch any eggs. I am sure there are several reasons for that, but we have not solved the problem yet. We tried isolating the hens as they went broody, but they would get so upset in isolation that they would break all their eggs in their attempts to remove themselves from the isolation pen. We tried to isolate them in the hen house where they originally went broody, but they would spend time escaping and stop brooding. So we decided to let them go naturally and see what happened. Well the answer was nothing...they have brooded eggs for three months now and not hatched a single egg. I believe that part of it is human error and part of it is that the other hens will not leave them alone. They literally will lay eggs on top of the other hens and those will fall into the clutch. We added numerous more egg boxes, but to no avail. We removed the nests completely in an attempt to break the broodies, but they gather another clutch and sit again. It would be great if they would hatch a set, but it does not seem to be in the cards. We know the eggs are fertilized so we can't blame it on Old Boy [our rooster]. I am simply perplexed. So once again we have cleared out the nests and the process is beginning again...
Having saved up a bit of money, we have decided to purchase some more chicks to continue with our revitalization process. We like to stick with heritage breeds. So we placed our order with several of our old faithfuls and a few new breeds in order to see how they adapt to life on the homestead. I ordered more Black Australorpes [ who have done outstanding living here, are calm, and adapted great to the winter and to free ranging]. In addition we are trialing Silver-laced Wyandottes, Welsummers, and Spotted Sussex. In other attempts we have been trying to find a rooster that will fit in better at the homestead. So far we have had several roosters that have not passed the test. Our Black Australorpe roosters were aggressive to one another and to humans. The Buff Orpington roosters were very aggressive to the hens, so we did not attempt letting them into the flock. The best success we have had is with the Barred Rock roosters, of which we had two lead the flock. The first did well, but was aggressive with the children and my wife. He finally crossed the line and made a trip to the stew pot. Our second has been doing well, but once again is becoming too aggressive with the children and my wife. He is well on his way to the stew pot. Through research, I have heard good things about Blue Laced Red Wyandotte roosters. So we have ordered a few of them in an attempt to see if my research is true. Come next spring we will have a new rooster leading the girls, one I hope that develops a great relationship with the family. In an attempt to solve our broody issue, my wife has heard great things about using surrogate brooders, specifically silkies. We are looking to establish a small broody flock of Blue Silkies. She has made plans and so a few of them are on their way as well.
In an attempt to solve another issue, we are also going to be experimenting with a completely new type of poultry! We are very excited about these fellows, hearing great things about their ability to remove TICKS. One of our daughters seems to be a tick magnet. We can't figure out the reason why, but for some reason she attracts them like no one else in the family [including the critters!]. Recommendation: Guineas! They should prove to add some interesting aspects to the homestead for sure.
In my ongoing desire to raise heritage breed turkeys and bring back the turkey farm - once again it is just not viable. The minimum limit I have been able to find is 15 - 20 poults. That is just not a feasible number in my opinion, so once again I will hope for a better opportunity next year. But anyone who has raised turkey can say, their is nothing like a home raised turkey! When we had our first experience with raising our own turkey for the fall feasts, it was the best tasting turkey I ever had in my life. It was nothing like the ones we had purchased over the years. The taste was enchanting, so juicy and enjoyable. The only option I could find at this time was to go with the broad-breasted white. If you are unfamiliar with turkeys, you should know that the broad-breasted breeds have been bred for table-fare and nothing more. To the point that they are unable to reproduce naturally. Hence, they will not meet our desire to be able to breed them. So instead, I purchased them knowing at least that they would be cared for and raised humanely and completely organically by our own hands.
So the next month will be quite exciting as the new chicks, poults, and keets arrive. I am already thinking of how to create a brooding complex to handle the different needs of each group as they arrive. It shall be exciting!

Saturday, August 3, 2013

Sunday, July 28, 2013
Future Hunters Arise!
Great news! Everyone passed their test and are eagerly awaiting the opportunity to go afield and enter the chase. Our oldest will be able to get her license immediately, while the other two will have to wait for their 12th birthdays. She is quite excited that she will be able to go deer hunting this year. They have all been out in the blind with me, but never with a chance at taking a shot. Their next project is earning enough money to obtain a bow, rifle, and shotgun suitable for their use. We shall see what the future holds!
Homestead Root Beer!
The kids have been asking about doing some brewing, as they seem quite interested in the subject. When I learned that root beer could be brewed at home and was actually a pretty simple process, I figured that this was the perfect opportunity. So we proceeded to begin the process with everyone giving a hand to finish the process. The boys started it all off by sterilizing a cereal bowl, measuring spoons and cups, the brewing bottles, mixing bowl, thermometer, funnel, and mixing spoon. Once they were fresh and clean, the girls stepped in and started the process. They warmed up a gallon of water to 95 F [check with thermometer] and then poured a cup of it into the cereal bowl. To which they added a 1/4 teaspoon of brewer's yeast and then set it aside. The rest of the water was poured into the mixing bowl and then everyone took a turn adding 1 cup of packed dark brown sugar, 2 cups of white sugar, and 2 2/3 tablespoons of root beer extract [ 2 tablespoons and 2 teaspoons] and mixed it up until everything was dissolved. Once dissolved, the cereal bowl of yeast was added to the mixing bowl and then all mixed together. The 'mixture' was then poured through the funnel into the brewing bottles. Be sure to leave a nice gap between the top of the bottle and the lid as to allow the excess gases to escape and not cause the bottles to explode. [ Plastic brewing bottles can be obtained that have caps with a hole in them and a latex fitting which will allow gas to escape. We had some available from another brewing kit. If you are not using such bottles, you can leave the bottle uncapped and instead place a balloon over the lid and secure it in place. It will allow the mixture to breath. ] Then place the bottles in a dark, warm place for about three days - or until the bottles are firm when given a squeeze. We stuck ours on the top shelf of the pantry. The kids were sure to check on it each day. On the third day they were ready and so we placed them in the fridge and let them chill for 24 hours. The next day we broke them open to try. Consensus was 6 to 2 that it was great! I think the fact that it didn't taste like the root beer that they are used to made a difference. It was rich, creamy, and foamy -you could definitely taste the dark brown sugar in the mix. We are going to brew another gallon and see if it tastes any different. May substitute dark brown sugar with light brown sugar. I also found an original recipe for root beer. If we can get ahold of all the herbs it calls for, I think we will give it a shot as well.


Friday, July 26, 2013
Hunter-Trapper Education Class
Tomorrow is the big day. The three eldest children have been diligently studying the online portion of their hunter-trapper education course [seems nowadays their is a 4 hour online course that must be completed prior to attending class, guess things change over the years.] They are quite excited, as am I. Upon completion of the course and their 12th birthday they will be able to obtain their first hunting license and begin what is hopefully a lifelong joy of hunting. They have already spent quite a few years afield with me on various occasions, but have never been able to actually have their own gun and 'hunt'. I believe this is an important milestone for them, and one they have been looking forward to for many years. They are growing up and the opportunity to provide for the family through the hunt is now before them. I plan on rewarding them with a feast/bonfire and a gift if they pass. I am thinking that a knife making kit would be a great gift. They could create a blade that would serve them well for many years. We shall see what tomorrow holds!
Sassafras
Scientific Name: Sassafras albidum
aka Sassafrax,White Sassafras, Red Sassafras, Silky Sassafras, Winauk, or Cinnamon Wood
A distinctive tree that is very abundant here on our homestead. For those unfamiliar, it is a deciduous tree with three different shaped leaves that share the same branches from a trilobed, two-lobed or single lobed elliptical leaf that appear green to yellow-green. In the fall they turn a flaming shade of yellow and some leaves may be tipped with red. The entire tree is aromatic and spicy. When you break a branch or rub against it you will definitely notice the scent - which personally I enjoy. It is very easy to recognize once you see it and all of the kids can pick it out. It makes a refreshing tea which can be enjoyed in small amounts. The goats and pigs also seem to love it!
aka Sassafrax,White Sassafras, Red Sassafras, Silky Sassafras, Winauk, or Cinnamon Wood
A distinctive tree that is very abundant here on our homestead. For those unfamiliar, it is a deciduous tree with three different shaped leaves that share the same branches from a trilobed, two-lobed or single lobed elliptical leaf that appear green to yellow-green. In the fall they turn a flaming shade of yellow and some leaves may be tipped with red. The entire tree is aromatic and spicy. When you break a branch or rub against it you will definitely notice the scent - which personally I enjoy. It is very easy to recognize once you see it and all of the kids can pick it out. It makes a refreshing tea which can be enjoyed in small amounts. The goats and pigs also seem to love it!
[[The following information is shared for informational purposes only. It is not meant to be used for diagnosis or treatment of any illness or injury. Always consult with a physician or other qualified medical care provider concerning the diagnosis and treatment of any illness or injury.]]
It has been used by the Native Americans, the Europeans and early Americans as a medicinal herb. The leaves & roots can be used as teas or poultices and the bark could be crushed and steeped in boiling water. It was used to reduce fevers, treat rheumatism, gout, dropsy, kidney disease, toothaches, to relieve inflammation of the eyes, ease menstrual pain, cure various skin conditions [including insect bites, germs, and head lice], used as an antiseptic, to cure urinary tract infections, to relieve swelling, to treat syphilis and even cancer.
Sassafras can be used to flavor sodas and teas. It is also used in cooking as a thickening agent, in salads, as a condiment, or to brew beverages.
It contains a chemical called safrole which has been labeled by the FDA as a carcinogen. This was after testing in rats which were given extreme dosages each day, each person can be their own jury in this. Excessive dose of sassafras can cause anxiety, shakiness, abnormal heart beats, vomiting, dilated pupils, stupor, spontaneous abortion, collapse and even death.


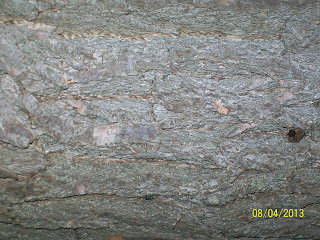
Sassafras can be used to flavor sodas and teas. It is also used in cooking as a thickening agent, in salads, as a condiment, or to brew beverages.
It contains a chemical called safrole which has been labeled by the FDA as a carcinogen. This was after testing in rats which were given extreme dosages each day, each person can be their own jury in this. Excessive dose of sassafras can cause anxiety, shakiness, abnormal heart beats, vomiting, dilated pupils, stupor, spontaneous abortion, collapse and even death.


Tuesday, July 23, 2013
Homestead Handyman
The day began without a plan, hoping for one of those sunny days like we have been having for some time now - but to no avail. Off the job for a week, so been planning on painting the goat shed. Today was not to be that day! Forecast was for rain and it came. In between though I did finish cutting the last two panels for the goat shed and screwed them in place. Came back up to the house and decided to take care of another problem on the list. When we added onto the old place, I was very green and following the ways of a couple of old timers who were teaching me the ropes. I know now what I did not know then - the importance of OVERHANG on a roof. Not sure as to why that was left out when we built the roof, but none the less it didn't take long for us to notice a problem. Water had been creeping down the inside of the exterior wall and soaking the floor and interior wall. So I grabbed the old sledge hammer and pry bar and proceeded to rip off all the wood on the exterior wall. Then came the scraping of the old insulation, then chipping out of the floor and general cleansing. Had the boy giving me a hand in that process. Continued moving along and reinsulated it, then replaced the exterior wall with fresh new boards. So that moves the interior wall closer to the top of the list. Tomorrow's plan is to go and retrieve as much timber as possible to side the lower half of the addition, grab a few sheets of plywood siding for the top half, and also recover a ton of cement blocks from a friend's scrapped construction project. Figure on rolling the older ones out of bed bright and earlier so they can assist! They do love helping out though, and are learning a lot. Not a project goes by that they don't help in some way. Teamwork! Makes it go by faster too.
We also built a milking stand for the goats, as we want to start training the doelings on the routine. I found a few plans online and kind of adapted them as best I could. Ended up only needing two brackets to reinforce it, was able to find everything else I needed around the ole homestead.


We also built a milking stand for the goats, as we want to start training the doelings on the routine. I found a few plans online and kind of adapted them as best I could. Ended up only needing two brackets to reinforce it, was able to find everything else I needed around the ole homestead.


Monday, July 15, 2013
Corn Cob Wine
As I sit here and contemplate the hours until the 40 begins again, I thought I would post about one of my first brewing experiences. Last year, we canned a lot of corn. Trying to make sure we could use everything possible, I began looking for something to do with the cobs that we had cut all the corn from. We ended up with a couple of options: Corn Cob Jelly and Corn Cob Wine. I will discuss the jelly in another post, but needless to say, I had been wanting to try my hand at brewing for years but I never had the patience. This recipe seemed simple enough so we gave it a shot.
You will need:
A plastic gallon jug
8 corn cobs [roughly]
1 packet of yeast, activated [1 teaspoon sugar, 2 tablespoons of warm water + yeast]
3 quarts of water
2 cups sugar
Mason jars
Coffee filters/fine strainer
Slice the lid of the jug so as to create a hinge. Slide the corn cobs inside the jug. Boil the water and then dissolve the 2 cups of sugar inside after removing it from the heat. Once it cools enough to handle, pour the water/sugar mixture into the jug up to about an inch or so from the rim. Then add the activated yeast to the mix. Close off the slice in the jug enough to stop any unwanted visitors, but with enough space to allow gas to escape from the fermentation. Then put the jug into a nice warm place and check on it until it stops bubbling [roughly 1 1/2 to 2 weeks]. Once the fermentation stops, decant the liquid through a filter [coffee filters or a fine strainer work just fine] and into a Mason jar. Place it in the fridge and allow the yeast to settle out. You can decant it further if you wish, or just drink it straight from the jar, slowing once you get to the bottom. In all honesty, I have to say I was impressed with the simplicity but nice quality product. It is definitely something we will continue to try as this year's harvest comes around again. Enjoy!
You will need:
A plastic gallon jug
8 corn cobs [roughly]
1 packet of yeast, activated [1 teaspoon sugar, 2 tablespoons of warm water + yeast]
3 quarts of water
2 cups sugar
Mason jars
Coffee filters/fine strainer
Slice the lid of the jug so as to create a hinge. Slide the corn cobs inside the jug. Boil the water and then dissolve the 2 cups of sugar inside after removing it from the heat. Once it cools enough to handle, pour the water/sugar mixture into the jug up to about an inch or so from the rim. Then add the activated yeast to the mix. Close off the slice in the jug enough to stop any unwanted visitors, but with enough space to allow gas to escape from the fermentation. Then put the jug into a nice warm place and check on it until it stops bubbling [roughly 1 1/2 to 2 weeks]. Once the fermentation stops, decant the liquid through a filter [coffee filters or a fine strainer work just fine] and into a Mason jar. Place it in the fridge and allow the yeast to settle out. You can decant it further if you wish, or just drink it straight from the jar, slowing once you get to the bottom. In all honesty, I have to say I was impressed with the simplicity but nice quality product. It is definitely something we will continue to try as this year's harvest comes around again. Enjoy!
Subscribe to:
Posts (Atom)