Sunday, August 25, 2013

Homemade Sauerkraut

If you have never made sauerkraut before, it is a great experience with results that will astonish you. The overall flavor and health benefits are amazing compared to the 'lifeless' limp cabbage that is sold in the store in can or bag.  Making your own sauerkraut is quite simple in truth. All you need is cabbage, salt, and a crock or bucket to store it in for fermentation. Then you rely on the natural process of lactic acid fermentation to create this crisp and lovely addition. [Will discuss more on this in another post.] I have even seen recipes that make small amounts in a single mason jar. I have never tried those, because one of the hidden treasures we found on our property was a set of ceramic crocks. Unfortunately 2 out of the 3 were broken, but the 10 gallon crock was in excellent shape and it has been a great tool for many a thing! Last year was the first year we made sauerkraut, using all the cabbage from our garden to make two batches of 5 gallons each. One batch we lost due to a learning curve, but the pigs enjoyed it so there was no waste! The second batch came out great and we ended up canning 12 quarts to use through out the year. Yesterday we made our first batch, or shall I say began making the first batch! You may have read previously that we lost 30 head of cabbage to the deer [grrr...], but I headed to the local farmer's market yesterday morning and picked up a few heads. In turn he made me a deal and I ended up with about 20 heads. It wasn't grown on our land, but at least I know it was grown organically and only a few miles away from us. So when we got home I gathered up the supplies, scrubbed the crock and rounded up the kids! The basic recipe rule is quite simple: 5 lbs of cabbage + 3 tbsp of salt. You can use more if you choose, but it is not recommended to use less as this will increase the possibility of spoilage.  Some people use a variety of additions to the recipe as well, from raisins, carrots, apples, hot peppers, to caraway, garlic, and ginger. I still prefer to keep it simple. Perhaps one day I will try altering the recipe in smaller batches, but I prefer to stick with what we like especially in large quantities.  

So here goes:
Step 1. Wash and clean your cabbage thoroughly. You will be relying on the lactobacilli that naturally live on the cabbage to perform the fermentation process. You do not want the addition of any other bacteria or contaminants that can change the flavor or cause issues with the process. 

Step 2. Once you have cleaned the cabbage you can slice it how you desire. There are numerous cabbage shredders available that can assist you in the process, or you can use a kitchen knife. I prefer the knife. Now some folks leave out the hearts, slice it a certain manner, or dice it all the same size. As I said the choice is yours. I make a mix of shreds and chops, using all but the very core. I let the pigs and rabbits enjoy those. 

Step 3. Place the shredded cabbage into the crock and sprinkle the salt on top. Our first year we followed a recipe which left us with an extremely salty kraut. This year I used my own senses to add salt as we went. The salt will begin to cause the cabbage to become 'limp' and expel water. 
Shredded Cabbage and Salt. The 'stick' is my Kraut Masher.

Step 4: Mash the cabbage! Some folks now begin wringing the cabbage with their hands, or just packing it in. I didn't learn that way and actually think that using a kraut masher or pounder makes more sense. I found the perfect masher last year while walking in the woods. A tree had fallen and I loped off one of the branches, peeled it and I had my masher. It worked perfectly. This will be it's second year of use and it still looks great.  You want to mash the cabbage until the brine completely covers the cabbage. This is the most labor intensive part of the procedure. This also makes a great family activity! I had each of the kids switching off with me, which made it go smoother for everyone. I also wanted them to have an actual hand in the process as it brings a greater appreciation to the kraut. It can take a bit of time but if you use a solid up down motion moving in a circle around the crock then working the middle, it seems to go faster.  Do not use a motion like churning butter nor use extreme force as you will crack your crock! You will notice bubbles forming in the brine as well which is a good sign!
Lots of juice forming this layer is about ready.
Step 5: Now is the time to slice up another layer of cabbage, then repeat the process all over again. When you mash the cabbage, be sure that you are mashing it and not just pushing the freshly sliced cabbage underneath the mashed cabbage and brine from the previous layer. Each layer should be salted and mashed on its own. You do not want to fill the crock with say 10 lbs of cabbage at a time and add salt, etc. It is a lot simpler and more thorough [safer] to mash smaller amounts. I normally shred three heads, add salt and mash until I have used up all my cabbage. This year I actually made it all the way to the top and so we have 10 gallons of sauerkraut fermenting. 
Filled to the rim with goodness!
Step 6: Once you are finished mashing and the brine is covering the cabbage, take a clean plate and place it on top of the cabbage. I then take my plate and push it down making sure to submerge all the cabbage under the brine. Push it down to really pack it in place. 


Then you can set a clean rock or bag filled with water on top to hold the plate in place. I prefer to use a mason jar filled with water. Be sure to clean the rim as well from any splashed juice or cabbage bits. The process is anaerobic which means it need to be untouched by oxygen. This also keep you safe from contamination.


Step 7: Now is when you can place your lid on top. To keep the crock sealed from any critters or microbes who will make a home on top of your fermenting cabbage. The first batch I ever made was lost due to the curse of the fruit fly. Little buggers didn't mind it at all, unfortunately I did. Now I completely seal the lid using plastic wrap. Then I set the crock in the kitchen to keep it fairly warm and allow the process to continue. I will check it daily to see that all is going well. I will keep you posted as the process continues.

To Be Continued...

Thursday, August 22, 2013

CITY FARMER

I have been doing research into cover crops. They appear to be very beneficial to the land and in turn to the homestead as well. We have also been wanting to grow our own wheat so that we may process it into flour for our baking needs. So, I had a bit of free time after work and decided to stop at the local feed store and see if they carried a variety of such seed. Now, I will be the first to admit that I am not a 'farmer'. I do not have an educational background in agriculture, didn't grow up on a farm, etc. [Though, I have worked for farmers as a youth.] I am a well educated and pretty intelligent man though. I learn quickly and know how to do research. But, even with doing research and reading, there is always something more that comes from talking with those who have the knowledge firsthand - so I like to ask questions when the opportunity presents itself. So I go into the store and there are two gentlemen working. One is a small dairy farmer, the other I am not positive about. I have talked with the one farmer quite a few times about various topics. So I begin asking questions about growing winter wheat. Find they have it available, that in our area you plant September 15th till late October. Nice! So then I ask a few questions about cover crops such as barley, oats, rye, etc. They give me bits and pieces of info. I then told them how nice it was to ask questions and get some first hand knowledge from them. They told me no problem, anytime I had a question to stop by. Now the farmer knows about our homestead and what I have been trying to do. So I explain that to the other gentlemen. He asks why I want to grow wheat, and I tell him to make out own flour. He tells me that it is way too much work. I told him that I am making hay by hand, and we like a bit of work. At which point he says he can just sell me the wheat berries and then I can go from there. Grr...missing my point. But I thank him anyway and tell him we might try that to experiment. Then he tells me "Oh I see, you are what I like to call a CITY FARMER." WTF? Really? Now I know in all honesty [ I keep telling myself anyway] that he didn't mean anything by it. But it started to piss me off. I continued the conversation a bit longer, asked a few more questions, bought some corn and off I went. The whole way home though, it kept irritating me that he called me a CITY FARMER. I kept asking myself why he said that. Does it make a me such because my family and I want a better life, a more sustainable, in sync with the land, wholesome real life? Was it because I didn't want to follow his advice and buy things instead of grow them on my own? Was it because I didn't want to use chemically treated seeds? Because I pasture my hogs? Cause I don't use chemical fertilizer or Round up? Because we keep so many different animals? Cause I am not planting hundreds of acres of row crops? Because I am not doing what he does? Guess in the long run it really doesn't matter but for some reason that name just irritates the shit out of me - but I think that is a good thing!

Sunday, August 18, 2013

Breast Milk for Chicks?

Well not exactly, but yolk is what the chicks eat inside the egg as they are developing embryos. So I was thinking wouldn't cooked egg yolk fed to chicks now help give a natural boost to their immune system as well as be a completely organic unaltered nutritious snack for them? Infant mammals thrive on breast milk and it is essential to developing babies health and immune systems. After doing a little research, it seems that I am not the only person to think along these lines. So after cleaning up some eggs for the fridge, I decided to boil up a treat for the chicks. I hard boiled a dozen eggs and took out all the yolks [the pigs and chickens enjoyed the shells and whites]. I then crumbled up about half a yolk on a plate and set it into the brooders. The blue laced red wyandottes, welsummer, silver laced wyandottes, and speckled sussex went crazy! They immediately devoured it all, chasing each other around in a game of 'chicken football' as I like to call it. The blue silkies and guineas were a bit slower to respond, but seem to be enjoying them as well! Once the plates were empty, I removed them and watched the little ones chirping away happily. I will take notes to see if there are any issues with it, but I think I just found a great snack that will help out the wee ones.

Blue Laced Red Wyandottes and Blue Silkies Day 5 on the Homestead

Just a few pics of the the chicks on their 5th day here. They have been doing extremely well! We did lose one of the Silkies, not sure what happened. My wife found it one morning when we woke up. They all seem healthy and happy though. Here are the pics:


Keets and Chicks! Order 2

Our keets and chicks arrived on Friday mornings. This order came from Cackle Hatchery. My wife had to go retrieve them from the post office in the morning. The keets were a running bustle of tiny bodies! This is our first time with Guineas so we are very excited to enter into their little world. The hatchery was running a special on straight run hatcheries choice keets so we signed up and are quite impressed with the variety that has arrived. There are several of each including White Africans, Pearl Grays, Lavenders, and Royal Purples. I believe they will be quite a beautiful flock! [And my wife loves the color purple!] They are definitely a joy to watch, though they seem so delicate compared to the chicks. We did lose two so far for no explainable reason, but there was two extra. From what I have read this is not abnormal, due to their size and excitability. Here are some pics:


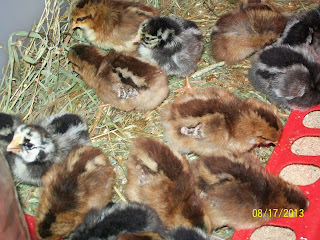
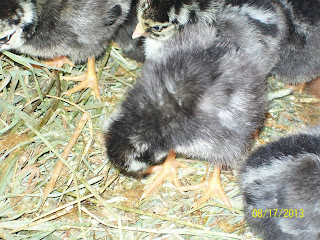
Our other chicks also arrived. They are WelsummerSpeckled Sussex, and Silver Laced Wyandottes. Unfortunately they were unable to add our Black Australorpes with this order so they will be arrived at a later time. They all are very healthy and active as well. I believe they are a bit older than 'day-old' because they seem larger and are showing feathers just like our chicks that arrived earlier in the week. Most likely they had to wait to be shipped to join the keets is what I am thinking. They are very beautiful chicks though, with very impressive colorings. Here they are:


Tuesday, August 13, 2013

An End of Summer?

I know that in our area, it has been one strange Spring/Summer. Compared to last year, it was an almost complete reversal. Instead of bludgeoning heat and drought conditions that greeted us this year, we have been pounded with humidity, cool weather, and rain. The weather channel is even calling for temperatures in the 40s tomorrow night??? The crops have suffered in spurts, still no red tomatoes, no hot peppers, slow growing squash, corn, and cukes. The greens seem to be enjoying and performing well, but that's about it. Lost the beans and cabbage to the deer. Another thing that I have been noticing is what seems to be an amazing number of late births in the surrounding wildlife. Most of the fawns that I have been seeing are tiny, hen turkeys wandering the woods with a single poult, robins laying eggs now or making new nests to start a clutch. My friend who is a botanist has been noticing the same things in the woodlands surrounding his home, so I know it is not my mind playing tricks on me. Then driving home on Friday, I noticed a couple tree that were changing colors already. On today's ride home the number was astonishing and their is an unmistakable chill in the air. Is fall fast approaching with winter right behind? Will we have a more intense winter this year? How will an early fall effect the livestock and wildlife? Lots of questions, that only time will answer. Not much time to stop and ponder, remember...

Poultry Order #1 Arrived

Our first order of chicks arrived today. These chicks were ordered from Murray McMurray Hatchery and arrived very quickly. We were notified that they shipped at 17:00 yesterday, and this morning they were at our post office. The Postman made a special trip to deliver them to the house. This order was our Blue Laced Red Wyandottes and Blue Silkie Bantams. When my wife opened the box one of the bantams had expired. The Hatchery included an extra of each though, so we are still up one. The little guy was buried in a peaceful spot in the forest. Everyone else seems to be doing extremely well and are very active. All have taken to the water and are pecking at feed in their new warm homes. We are keeping the two in separate  containers, as they will serve different purposes and not be part of the same flock. Included with our order was the option to have a free rare exotic chick included with the order. Of course we opted to do so. It will be a quite interesting experience attempting to identify the wee one! We have already made a guess, but will have to wait and see what he/she grows into as no one honestly knows which rare chick is included.

Blue Laced Red Wyandottes:

 Blue Silkie Bantams
The Rare Exotic Chick is the one on the right with the Gold face mask.


Sunday, August 11, 2013

Lazy day Pics

Cukes growing on jute trellis.

Bunnies enjoying some Swiss Chard!
Moss, our hound dog.
Bee on a sunflower.
Dying Indian Pipes - notice how they turn completely black.
Blackberries ripening!

Hens on patrol.

They love resting underneath the new porch.
Old Boy on watch...

Thursday, August 8, 2013

Garden Disaster

Early this morning as we pulled down the driveway, we pass one of our garden plots. Instead of gazing upon lush heads of cabbage and rows of bush beans, a strange sight appeared. The plants were all gone - I take that back there were still stubs sticking out of the ground as proof that the plants had once been there. 30 head of cabbage and six rows of beans completely gone! Of course we will have rabbits peruse the garden, a woodchuck or some turkeys will nibble, a deer or two in the corn - but that is part of living in the country. In three years we have never had a problem with deer - UNTIL NOW. It seems that in one night they were able to gorge themselves and completely wipe out the lower garden plot. An utter flippin' catastrophe. This puts a serious spin on our food supply and a goodbye to a majority of our canning efforts from our harvest for the season, because now the harvest won't be coming. This is a major disappointment as we are already having a strange growing season here. I am going to see if we can try to get another planting into the ground in hopes of a fall harvest.

Sunday, August 4, 2013

Scythes, Stoneware, Cannons & Morning Bacon

It has been a busy weekend. Had several plans for what was going to happen but had to adapt accordingly. Part of the roof is leaking on the exterior, so the plan was to remove the shingles and reshingle the area. Well when we got up it was raining, so that shot the plans to the wind. Couldn't quite start on the new porch either, since I didn't really think it was a good idea to work with wet timbers...so then I remembered that there was a festival going on at the local steam grounds. So after I took my wife to work, and cooked up a nice breakfast, the wee one took a nap, and then we loaded up and off we went. Seems like the rain was definitely a sign that I was supposed to take the kids out. At the festival there was a flea market, steam show, parade, tractors galore, the old farm buildings [cabin, barn, trading post, wood shop, print shop, and metal shop], civil war re-enactors, and food galore.

The first table we walked to after unloading the caravan [dad + 6 kids], had something that we have been looking to acquire for awhile. Stoneware shoulder jugs! I found three in very nice condition and with minimal chipping. After haggling a bit of a deal, I quickly took them to the truck.
At the old trading post, the gentleman had another item I have been seeking. I wasn't sure that the items he had were for sale or if they were just for show, but hanging in the rafters were a couple of scythes. I went in to ask him if they were available, but he was busy talking with another couple and the kids were ready to move so I determined to go back after a bit and see what I could find out. We stopped in the old cabin and let the kids look around. It is a one room original homestead cabin that they exhibit. I got into a bit of a tiff with the gentlemen inside though. My son made a comment that he wanted to live in a cabin like this when he was older and the man inside [in his late 40s early 50s] proceeded to tell him what a horrible life it was to live in a cabin like so. He was very discouraging in his attitude and while we walked away I made it a point to discuss the possible reasons for his attitude and told the children that he surely had no right to say what he said. After wandering through an enormous amount of tractors from the 1930's to present day, we came to the Civil War Encampment. The unit was a light artillery unit who had three cannons with them. After spending some time checking out the artifacts, they actually let the kids play with them...which gave me tremors watching them opening the old spy glass or rolling around the cannon shot, playing with the black powder revolvers - it showed that old time craftsmanship was made to last for sure. We spent a good hour and a half there, watching the cannons fire and exploring. Even had a nice trail lunch of pickles, peanuts, jerky and blueberry bread with sarsaparilla soda to wash it down. We walked around a bit more and then it was back to the trading post. After talking with the owner [a gentlemen in at least his 70's] he told me that no one in his family had figured out how to use the scythes since his grandfather. I explained what I want to use it for and he said since he had 4 he could part with one...for $5.00! I quickly scooped up the sturdiest one I could find and thanked him for his help.

Then it was off to the steam train, more shops, more tractors, then it was time to go home and feed the critters.

Sunday morning was a nice wake-up call! When I went outside there just happened to be four pigs wandering about the property, clearly not where they were supposed to be. Wish I would have took a picture though, because I sure felt like an old swineherder when I walked the piggie parade back to the hole they made in the fence. After repairing that and taking care of the rest of the critters we had breakfast and went right to work on the new porch [which you can see in the background of the pics]. We all worked all day on it till we ran out of timbers. It was a nice surprise though for mama when she got home! I can't wait to finish it. It is a 12' x 16' form, which is enormous compared to our old 3' by 3' porch. It should be the backdrop for a lot of good times to come. Once we got everything cleaned up and done for the day, we waited for mom to come home and finished off the rest of the homemade root beer. It was a great weekend!